Welcome back! In our last post, we laid the digital foundation by installing Proxmox. Our server is alive, but right now, it’s like a building with no internal walls. Before we can start moving in our applications, we need to build the network they’ll live on. This is where we bring the networking blueprint from Part 3 to life.
Our goal is to create a secure, segmented, and professional-grade network. To do this, we’ll run OpenWrt, a powerful open-source router OS, inside its own virtual machine. This VM will become the heart of our network, acting as the central router and firewall for the entire home.local domain.
Let’s dive in and forge this critical backbone.
Why OpenWrt?
My choice of OpenWrt over popular alternatives like pfSense or OPNsense came down to a key future goal: handling my home’s Wi-Fi network directly from the mini-PC.
pfSense and OPNsense are based on FreeBSD, which has historically had spotty compatibility and performance with many Wi-Fi chipsets. OpenWrt, on the other hand, is Linux-based. This puts it firmly in my comfort zone and gives it a significant edge in wireless driver support and flexibility.
In this post, I’ll walk through the full setup, including:
- Installing and configuring OpenWrt in a Proxmox VM.
- Creating and isolating network segments with VLANs.
- Setting up a secure WireGuard VPN with DDNS for remote access.
- Deploying AdGuard Home for network-wide ad-blocking and clean DNS.
Step 1: Giving Our Router a Virtual Home
While it’s possible to run OpenWrt in a lightweight LXC container, I’m opting for a full Virtual Machine to achieve the strongest possible isolation between my network controller and the rest of the system.
First, I downloaded the latest x86/64 image from OpenWrt’s official download page. Then, from the Proxmox host’s command line, I created the VM:
1 | cd /tmp |
I attached two network interfaces: one to vmbr0 (WAN bridge for internet access) and another to vmbr1 (LAN bridge for our internal network).
LXC Container (Lightweight Alternative)
If you’re OK with less isolation and want to try OpenWrt in an LXC container:
1 | cd /tmp |
Step 2: The Initial Configuration
With the VM running, I connected via the Proxmox console to perform the initial setup. The first steps are to set a root password and configure the basic network settings in /etc/config/network and a firewall rule to be able to access the openwrt web interface.
1 | # From the proxmox host, connect to the openwrt machine via serial console |
Example: /etc/config/network
1 | config interface 'loopback' |
Example: /etc/config/firewall
1 | config rule |
Example: /etc/config/system
1 | config system |
Once done, the OpenWrt LuCI web interface is accessible from a browser.
Before going further, I installed a few essential packages:
1 | opkg update |
Step 3: Drawing the Lines with VLANs and Firewalls
This is where our blueprint starts to take shape. I used the LuCI interface Network → Interfaces → Devices to create the VLANs we planned:
- VLAN 10: Administration
- VLAN 20: Services
- VLAN 30: DMZ
Here the detailed steps:
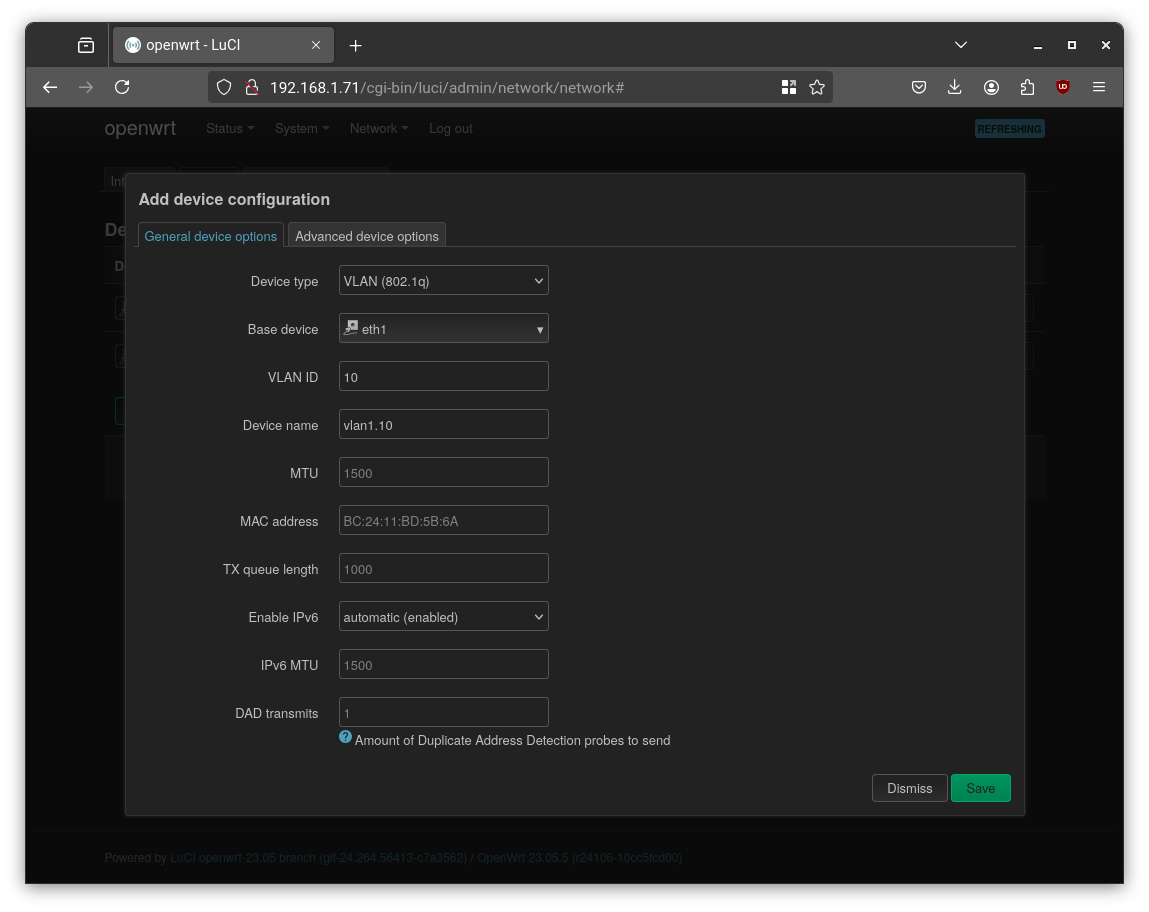
- Navigate to Network → Interfaces → Devices
- Click “Add device configuration…”
- Choose “VLAN (802.1q)” as the device type
- Set:
- Base device:
eth1(connected tovmbr1) - VLAN ID: e.g.
10,20, etc. - Optionally, name the interface
vlan1.10,vlan1.20, …
- Base device:
Repeat this for each VLAN.
Then go to Network → Interfaces and:
- Add an interface per VLAN (e.g.
vlan10) - Assign a static IP (e.g.
10.0.10.254) - Enable DHCP if desired
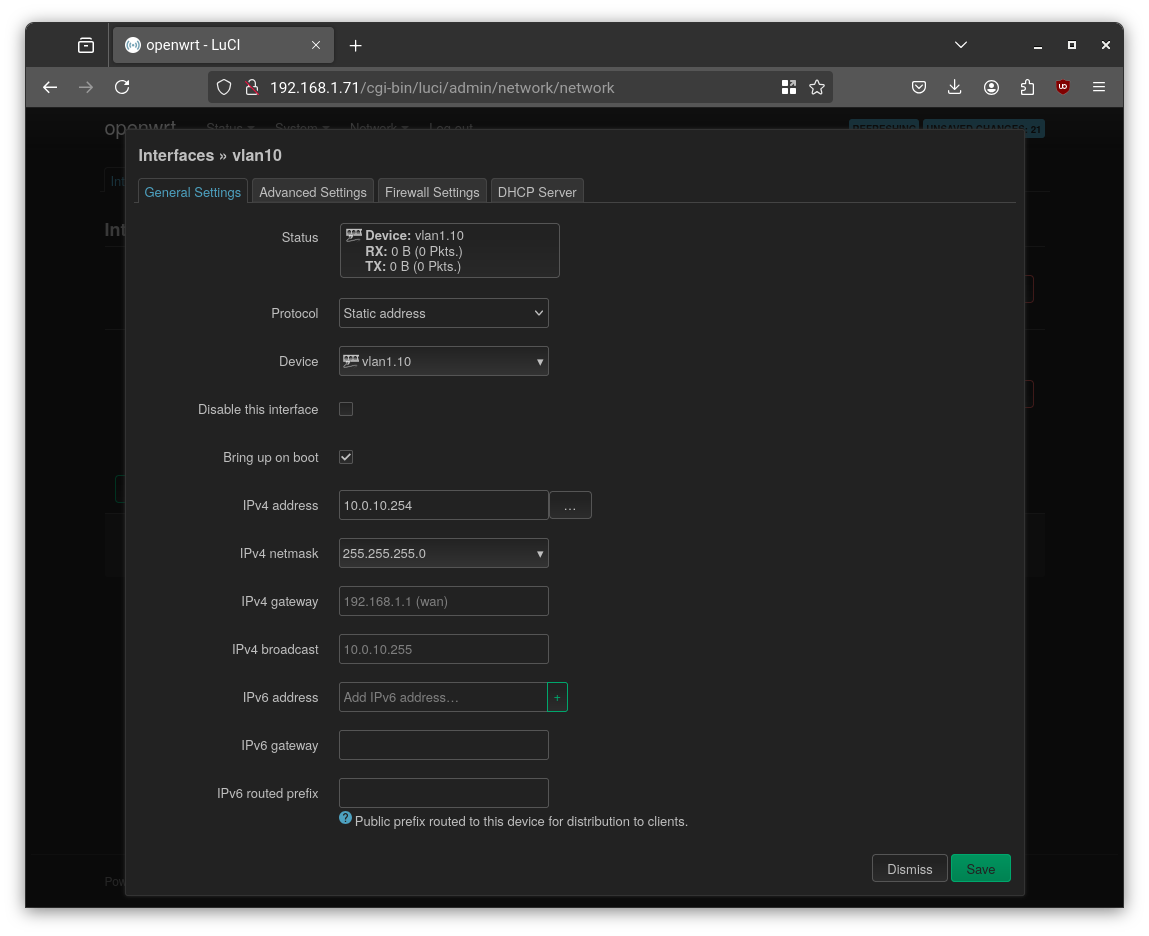
I configured 10.0.{VLAN-ID}.0/24 subnets with router IP 10.0.{VLAN-ID}.254.
Example: generated /etc/config/network (snippet):
1 | config device |
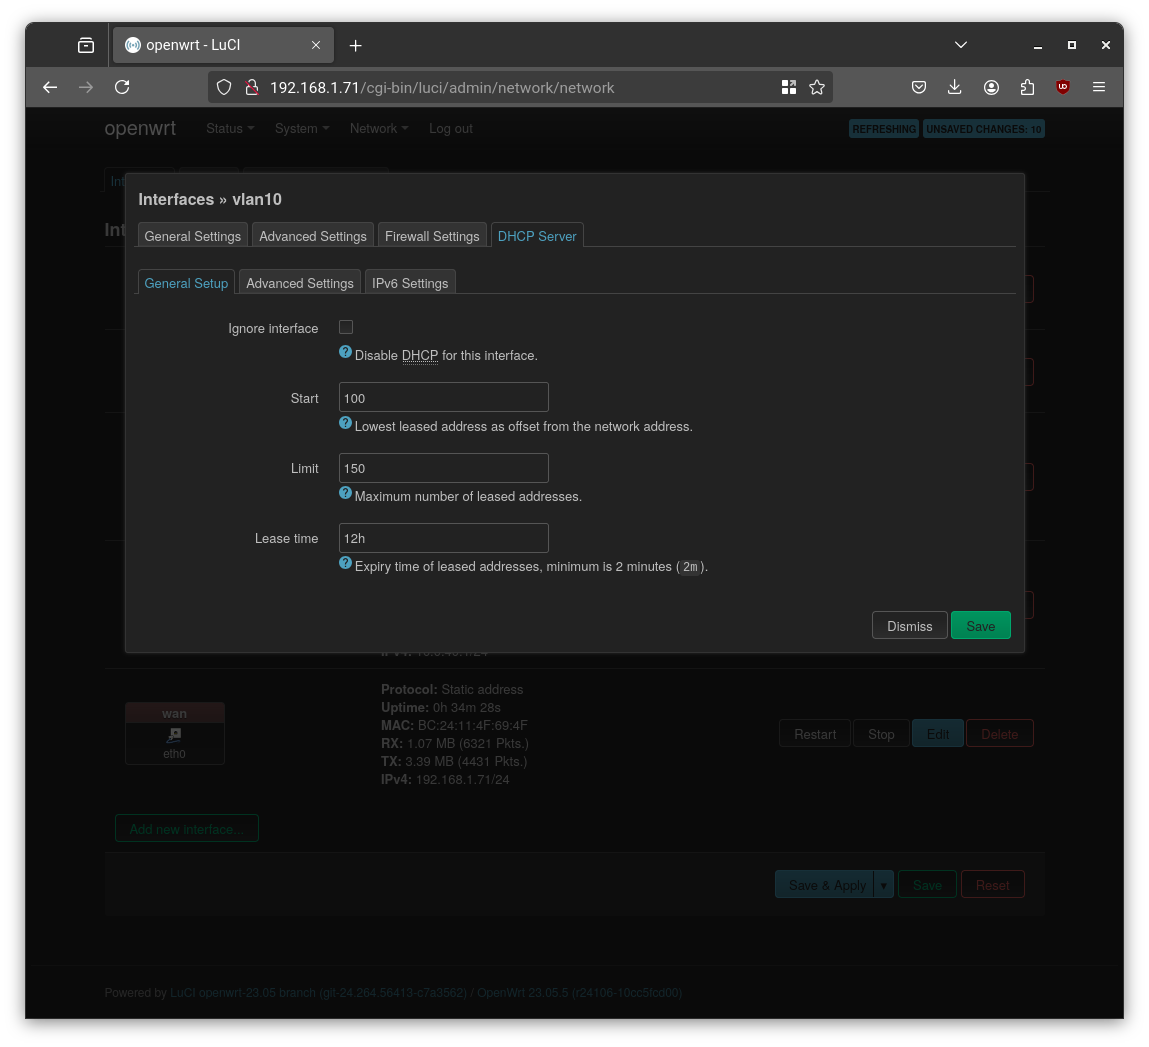
DHCP for VLANs
In each interface’s DHCP settings:
- Click “Set up DHCP Server”
- Use defaults unless customization is needed
1 | config dhcp 'vlan10' |
Firewall Configuration for VLANs
To manage VLAN isolation and access:
- Go to Network → Firewall → General Settings
- Add a zone per VLAN (e.g.
vlan10) - Assign the corresponding interface
- If internet access is needed, allow forwarding to
wan
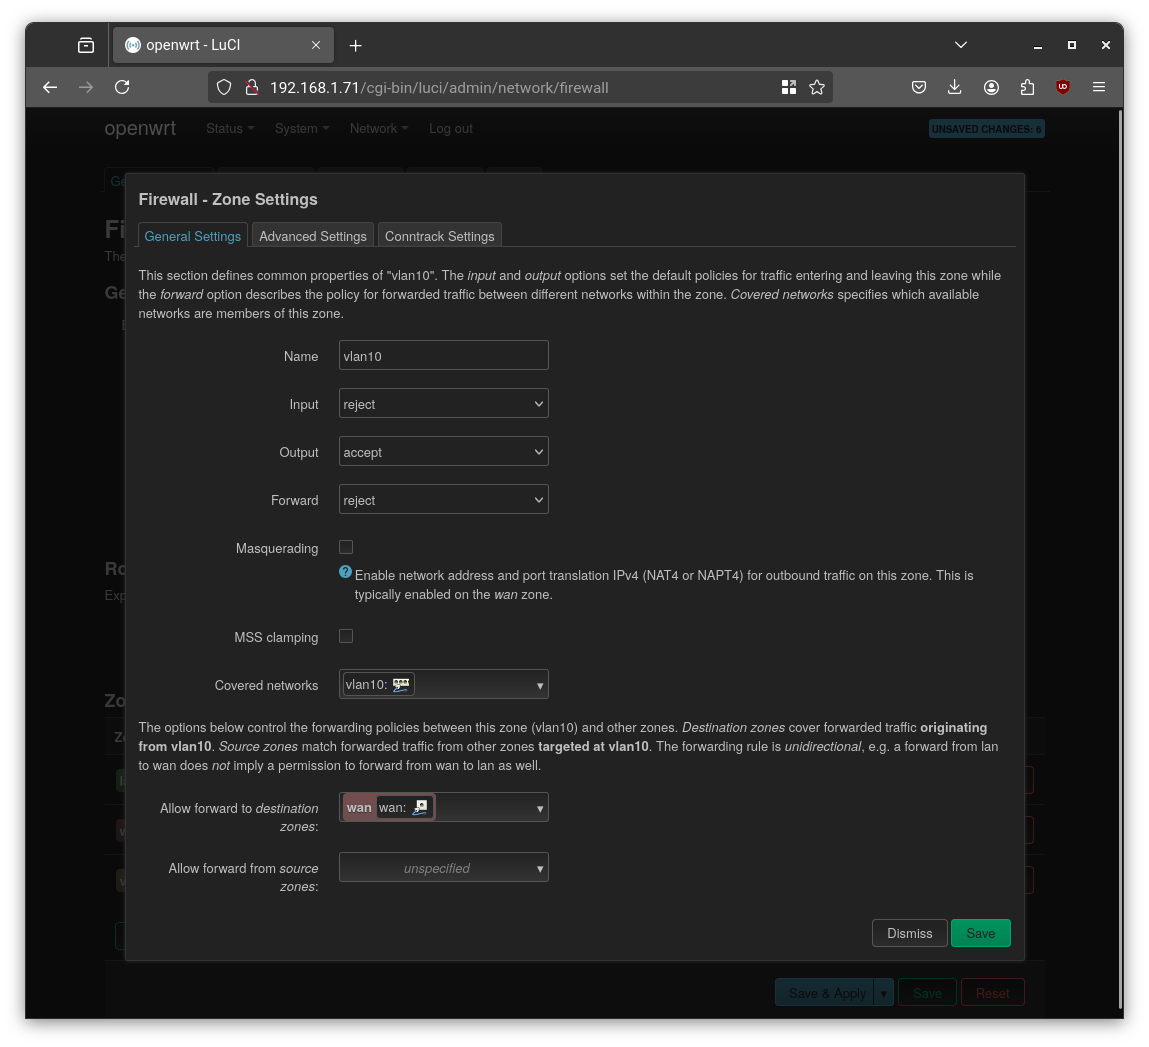
I deleted the default LAN zone since all traffic is now routed through VLANs.
By default, VLANs are isolated. To enable inter-VLAN communication, update the zone’s “Allow forward to destination zones” as needed.
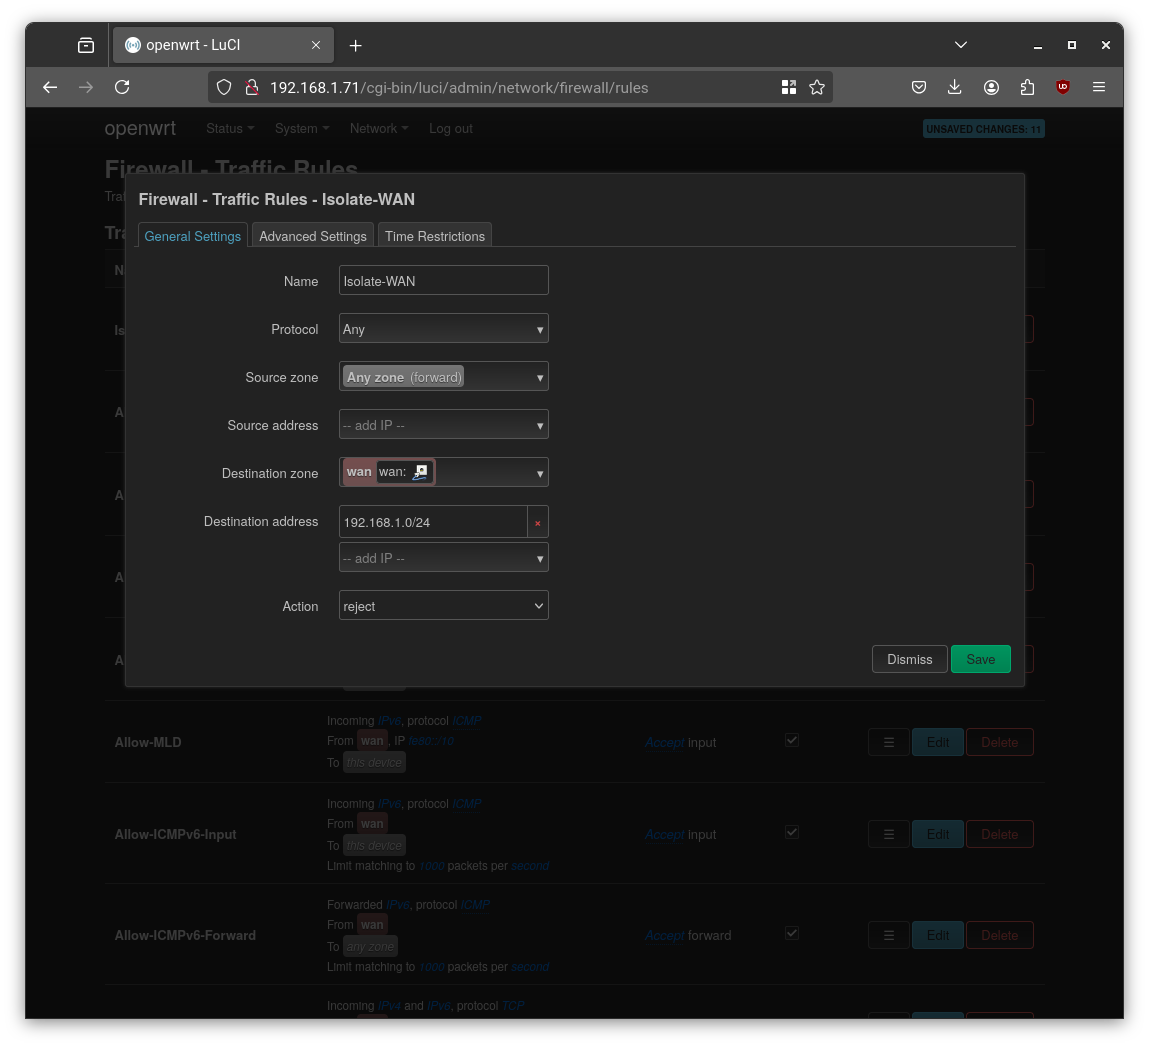
To prevent VLAN clients from accessing the WAN-side network directly, add a deny rule in Firewall → Traffic Rules.
Step 4: Accessing Our Home from the Outside World
To securely connect to my home.local domain from anywhere, I needed a VPN. But since my home ISP router doesn’t have a static IP address, I first had to set up Dynamic DNS (DDNS). This ensures my public domain name always points to my home’s current IP address.
Since I purchased a public domain name through Cloudflare, I’ll use their platform as an example in this tutorial. However, the process is very similar across most domain providers, so you should be able to follow along regardless of which service you use.
Configuring DDNS with Cloudflare
I created a simple script that checks my public IP and uses the Cloudflare API to update my DNS record if it has changed.
Prerequisites: You’ll need your Cloudflare Zone ID, Record ID for the subdomain you’re using (e.g.,
vpn.draka.me), and an API token with DNS edit permissions.Install Required Tools: If missing, install the following tools on your openWrt machine:
1 | opkg install jq curl |
- DDNS Update Script: I created this file at
/etc/ddns/cloudflare.sh.
1 |
|
- Automation: I made the script executable and set up a cron job to run it every 10 minutes.g the script, make it executable and create a cronjob on openwrt vm to automate its execution.
1 | chmod +x /etc/ddns/cloudflare.sh |
Now your domain (e.g. vpn.draka.me) will always point to your latest public IP.
Setting up the WireGuard VPN
With DDNS running, I could now set up a stable WireGuard VPN server.
- Install the Required Packages: Make sure the following packages are installed
1 | opkg install wireguard-tools luci-app-wireguard luci-proto-wireguard qrencode |
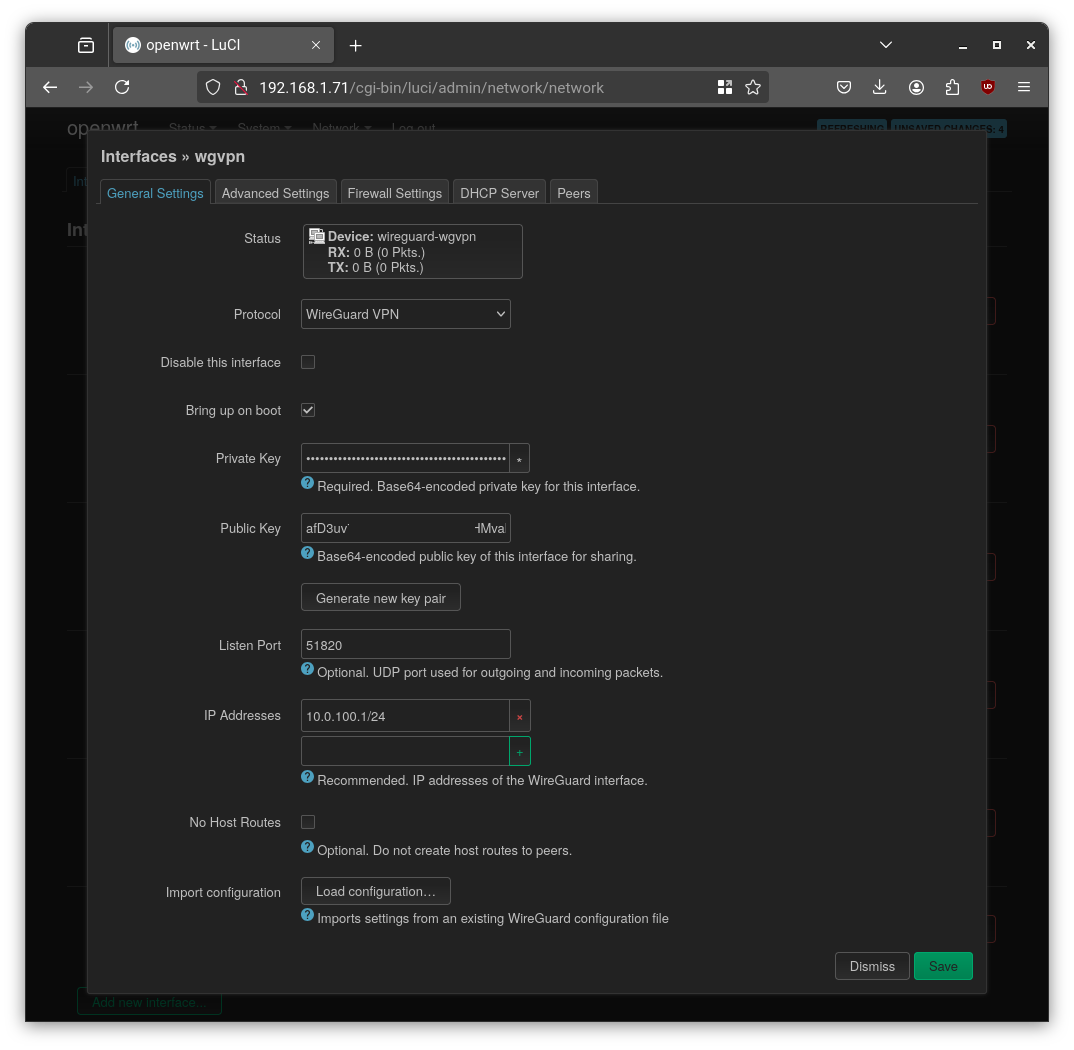
- Create the WireGuard Interface: In the LuCI UI under
Network → Interfaces, I added a new interface namedwgvpnwith the “WireGuard VPN” protocol. I generated a new key pair and assigned it a static IP address (10.0.100.1/24) for the VPN subnet.
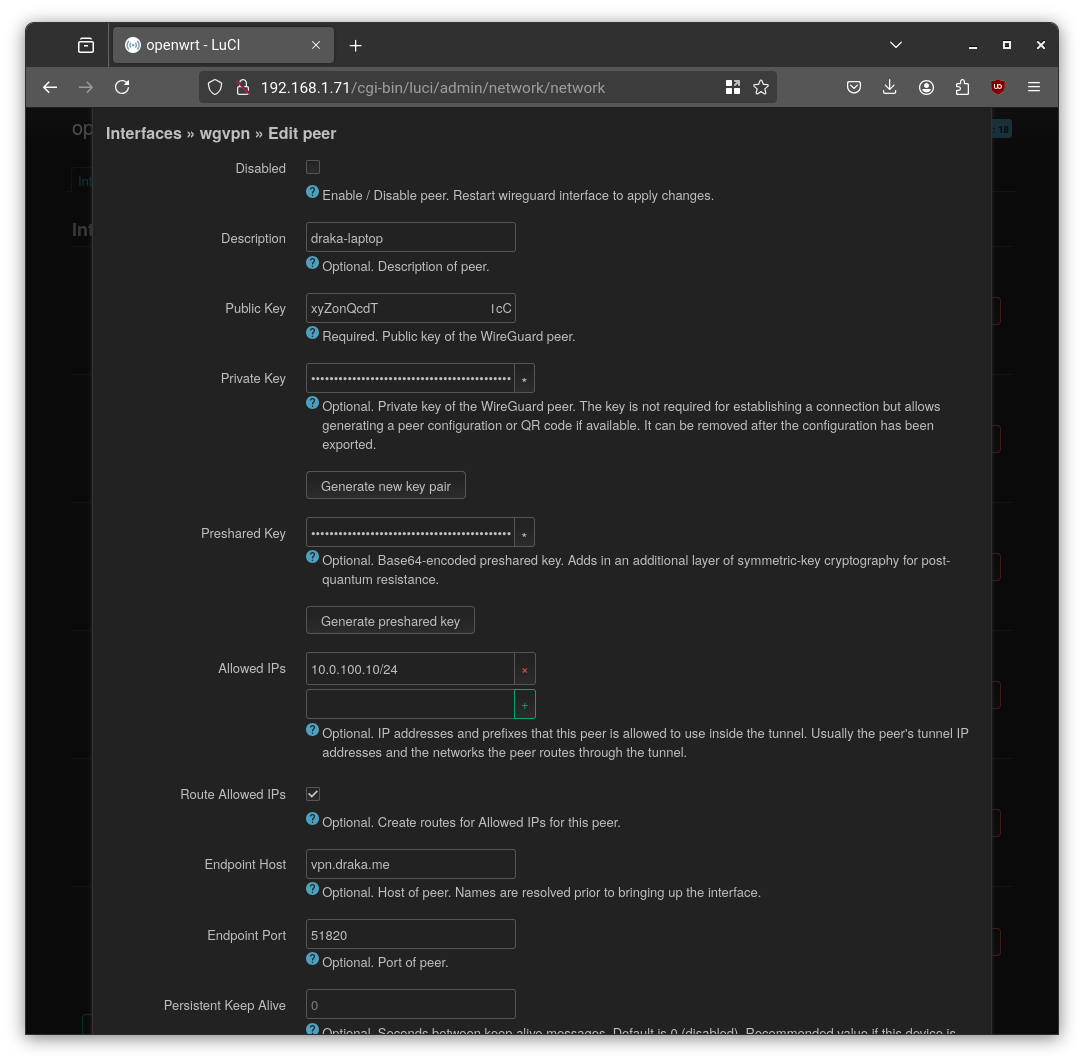
- Add a Peer (Client): In the “Peers” tab, I added my laptop as a peer, assigned it an IP within the VPN subnet (
10.0.100.10/24), and generated the client configuration file.
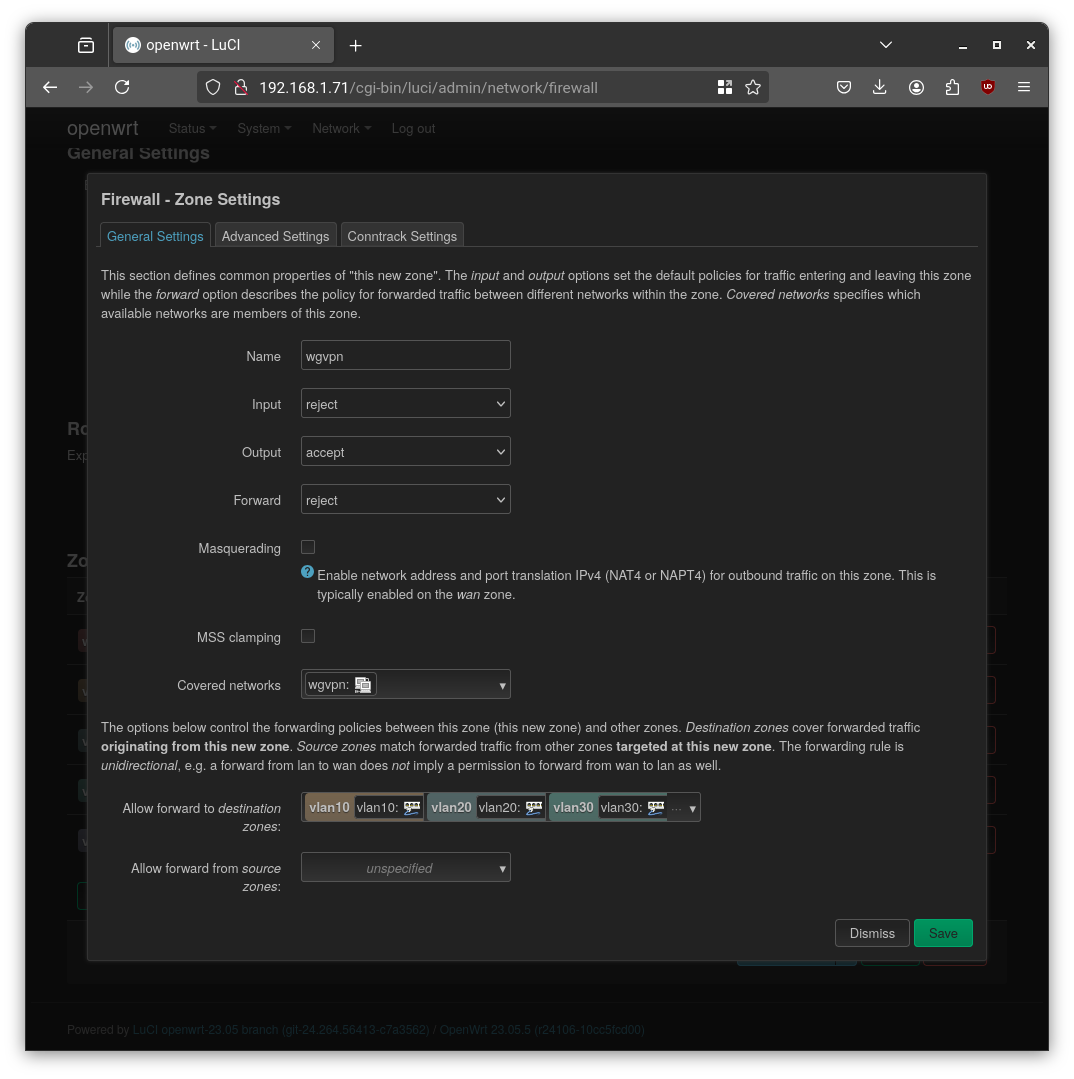
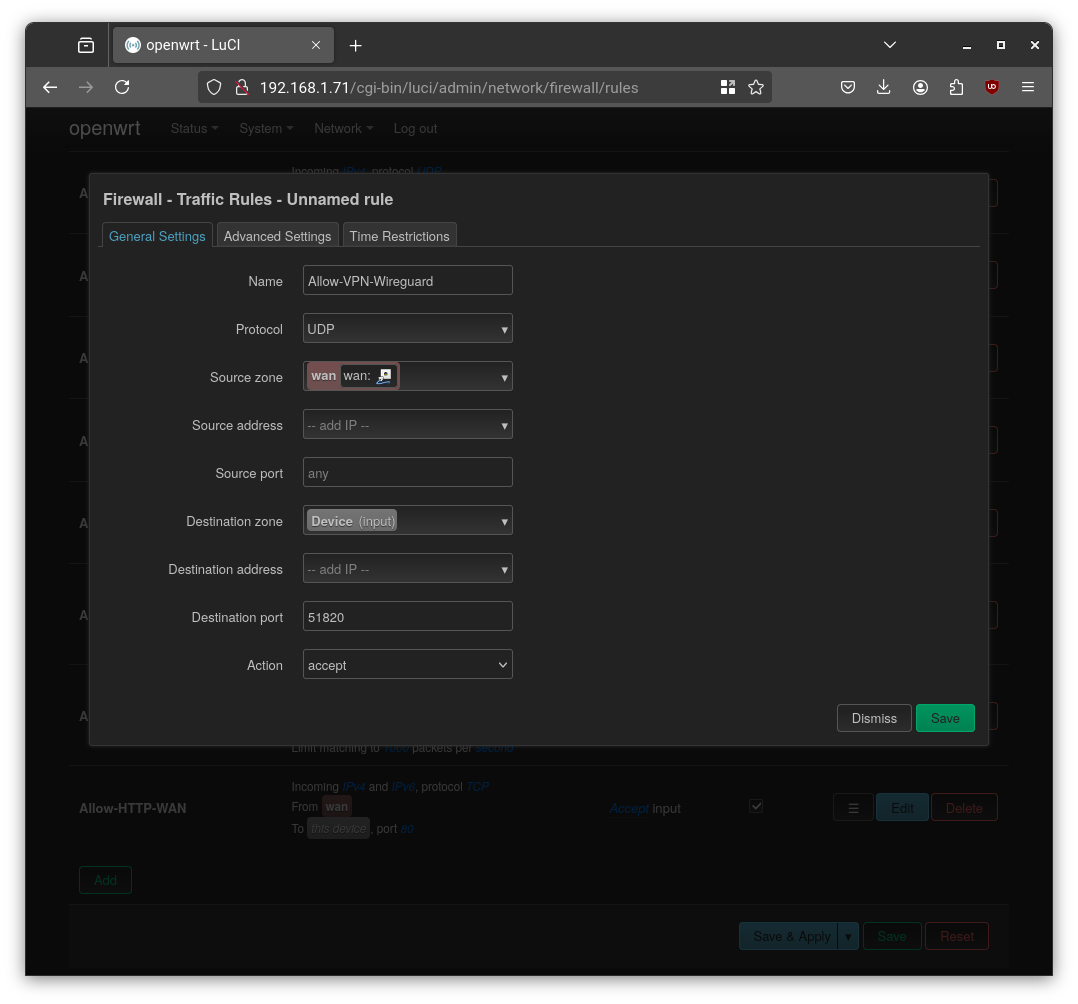
- Configure the Firewall: I created a new firewall zone named
wgvpnand assigned thewgvpninterface to it. Crucially, I added a traffic rule to allow incoming UDP traffic on port51820(the WireGuard port) from the WAN zone.
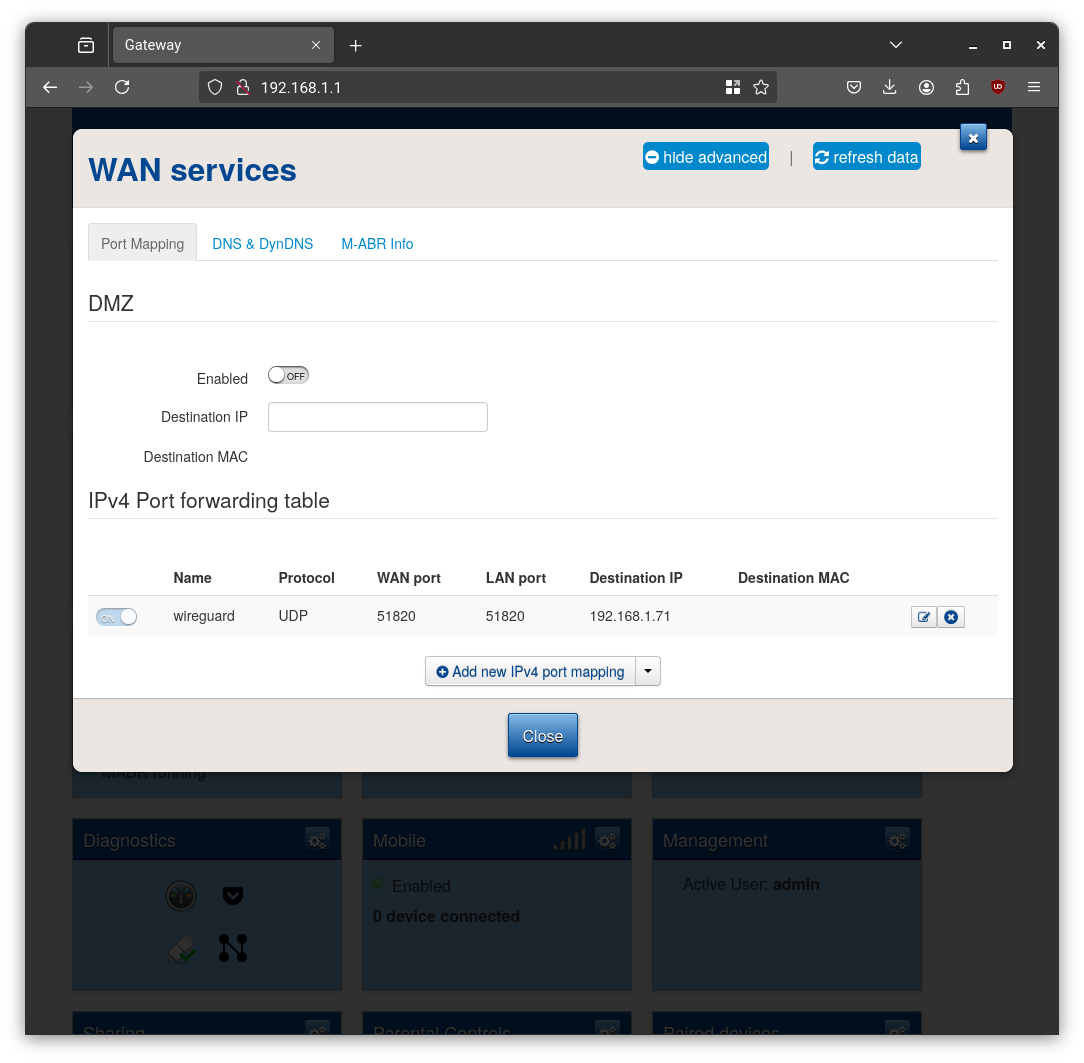
- Port Forwarding: The final step was to log into my main ISP router and create a port forwarding rule to send all traffic on UDP port
51820to the WAN IP of my OpenWrt VM (192.168.1.71).
Now, with a single command on my laptop, I can securely connect to my home.local domain, no matter where I am.
Connecting to the VPN from My Laptop
To connect to the VPN from your laptop:
- Install Wireguard Client, on debian based system:
1 | sudo apt update |
- Copy the previously generated configuration to
/etc/wireguard/wg0.conf
e.g.
1 | [Interface] |
- Then, to start the VPN tunnel, simply run:
1 | sudo wg-quick up wg0 |
Step 5: The Final Polish: Smart and Clean DNS with AdGuard Home
Now it’s the time to setup the DNS. In my setup, I want:
AdGuard Home to run on the default DNS port
53, acting as the primary resolver for all clients.OpenWrt’s built-in
dnsmasqmoved to a different port (5353). It continues to handle DHCP and resolve local hostnames (likepve.home.local).AdGuard is then configured to use
dnsmasq(127.0.0.1:5353) as a private upstream resolver for local queries.
These are the setup steps I made on the openWrt machine:
- Install the required package
1 | opkg install adguardhome |
- Visit the initial setup page at:http://192.168.1.71:3000
If it doesn’t load, create a temporary firewall rule to allow traffic on port 3000 from wan interface or temporarily stop the firewall:
1 | /etc/init.d/firewall stop |
- Configure
dnsmasq:edit configuration file at/etc/config/dhcp:
1 | config dnsmasq |
This keeps dnsmasq active for DHCP and local domain resolution, but delegates primary DNS to AdGuard.
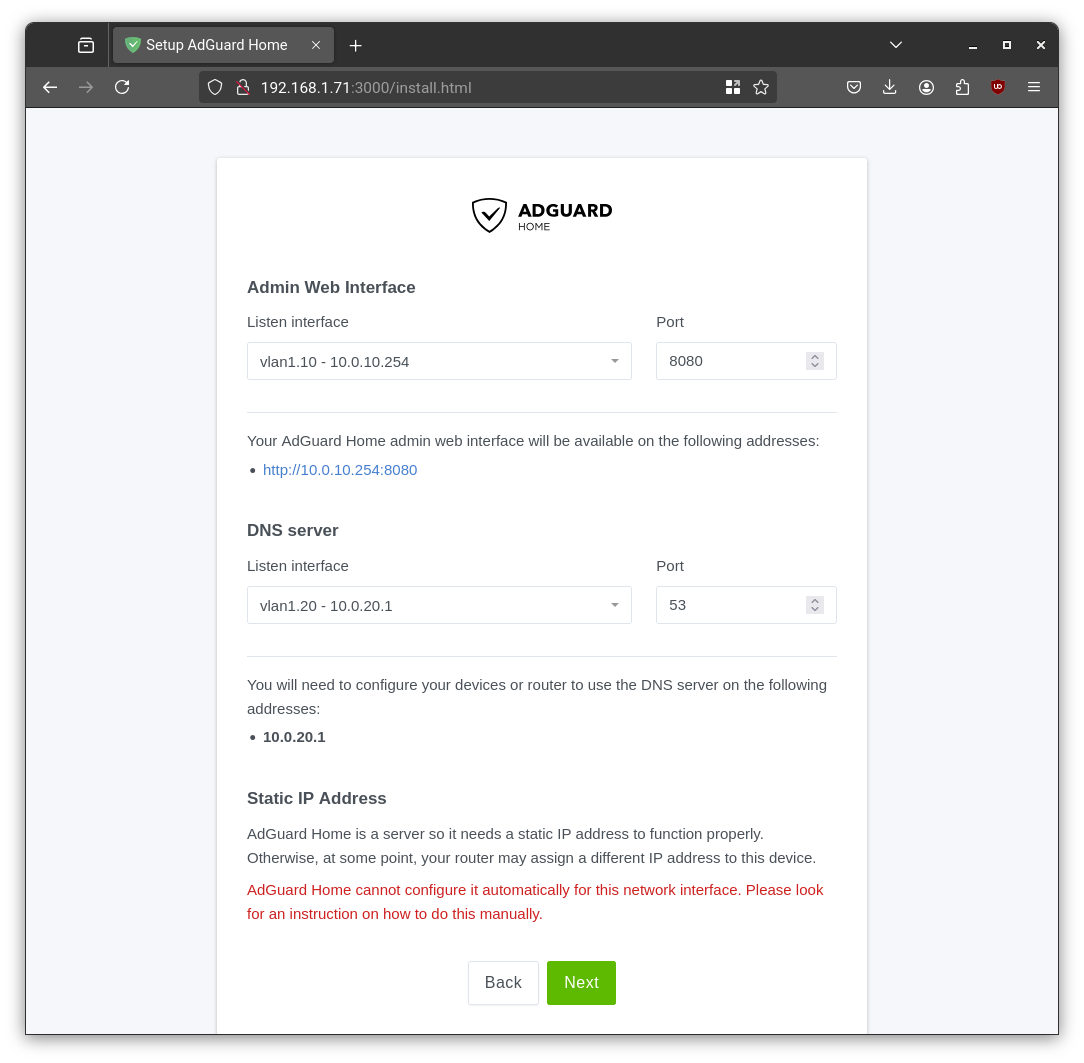
- Configure Adguard Home from the Web UI at http://192.168.1.71:3000
- During setup configure Adguard to expose the web UI on port 8080 on management interface on vlan1.10 (10.0.10.254) and to expose DNS server on vlan1.20 (10.0.20.1)
2. **DNS Settings → Upstream DNS servers**
- Add: `127.0.0.1:5353`

3. **Enable reverse DNS lookups**
- Tick both “Use private reverse DNS resolvers” and “Enable reverse resolving of clients' IP addresses” boxes under “Private reverse DNS resolvers”
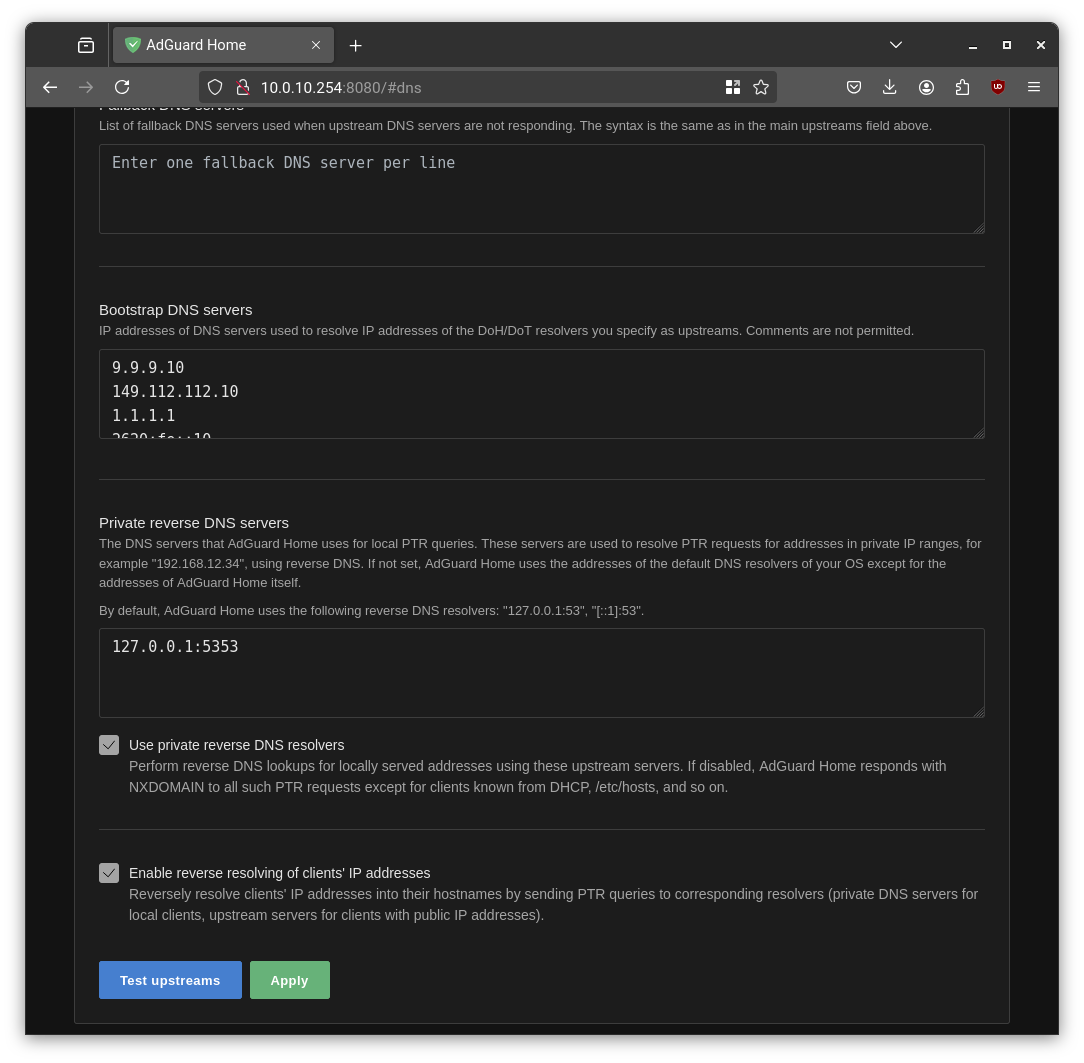
Now, local hostnames and reverse DNS will resolve correctly via AdGuard Home.
Conclusion: The Network is Forged
With OpenWrt at the helm, we’ve successfully built a secure, segmented, and powerful network, the central nervous system of our self-hosting project. We have isolated zones for security, a rock-solid VPN for remote access, and clean, private DNS for all our devices.
The network backbone is now firmly in place. This means we finally have a safe and structured environment to start building our services. And the most critical service of all is the one that holds our data.
In the next post, we will shift our focus from networking to storage. It’s time to build the heart of our system: a resilient Network Attached Storage (NAS) solution. I’ll walk through configuring our remaining SSDs into a RAID-1 mirror with ZFS, setting up a dedicated NAS machine, and planning our offsite backup strategy to ensure our data is safe, secure, and always available.
Stay tuned! 🚀