With the Mini-PC hardware from our last post on its way, it’s the perfect time to shift from physical components to the logical architecture. This is the planning phase, a crucial step where we design the software foundation for our server. A solid blueprint now will make deployment and operation much smoother later.
Physical Architecture: The Hardware Foundation
As a quick recap, my setup is built around three core devices:
The Mini-PC (The Core Server): With its Intel N100, 32GB of RAM, and three SSD slots, this will be our 24/7 workhorse. I’ll dedicate one SSD for the main operating system and configure the other two in a RAID 1 array for redundant data storage and backups.
The HP EliteDesk (The Research Lab): With 64GB of RAM, this machine is powerful but not power-efficient enough for 24/7 use. It will be powered on as needed to host a small cybersecurity research lab.
The Raspberry Pi (The Offsite Backup): This low-power device will live at my parents’ house, 400 km away. It will hold an offsite copy of my most critical data, providing disaster recovery in case of a fire, theft, or other local catastrophe.
Logical Architecture: Organizing Services and Workloads
With the hardware in place, it’s time to think about the logical structure of the system. How can I deploy and manage my services?
The most efficient and convenient way to host multiple services on a single machine is through virtualization. This is the same approach used by most cloud providers in their data centers, as it allows for flexible software deployment that is nearly independent of the underlying hardware.
Introduction to Virtualization
How do you efficiently run dozens of different services on a single machine? The answer is virtualization, the same technology that powers massive cloud data centers. It allows us to create multiple isolated environments on one physical server.
Two core technologies make this possible:
1. Virtual Machines (VMs): A VM is a complete, emulated computer with its own full operating system (e.g., Debian, Windows). A hypervisor manages these VMs.
- Type 1 (Bare-Metal): Runs directly on the hardware for best performance (e.g., Proxmox, VMware vSphere).
- Type 2 (Hosted): Runs on top of an existing OS, which adds some overhead (e.g., VirtualBox, VMware Workstation).
In Linux, KVM (Kernel-based Virtual Machine) allows the system to function as a Type-1 hypervisor. It uses hardware virtualization features such as Intel VT-x or AMD-V and, when paired with QEMU (an open-source emulator), provides the ability to create and manage VMs.
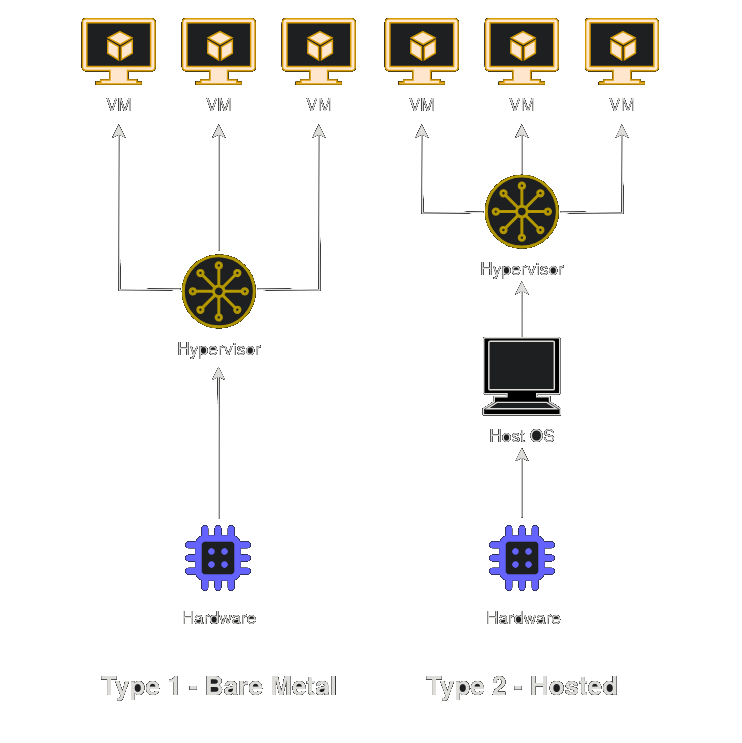
Type 1 vs Type 2 Hypervisors
2. Containers: Containers are a lighter form of virtualization. They share the host OS kernel, making them incredibly fast and resource-efficient, but with less isolation than VMs. Docker is the most popular tool for containerization.
| Feature | Virtual Machines (VMs) | Containers |
|---|---|---|
| Isolation | Stronger isolation | Weaker isolation |
| Resource Usage | Higher overhead | Lightweight |
| Security | Better (full OS isolation) | Lower (shared kernel) |
| Portability | Less portable | Highly portable |
| Performance | Slower | Faster |
VMs vs Containers
Given my focus on control and security, I’ve decided to use a hybrid approach that combines both VMs and containers. This allows me to take advantage of the unique strengths of each technology while mitigating their weaknesses.
Operating System Selection: Building on the Right Foundation
For the operating system, I evaluated two options. The first is a basic Linux distribution (e.g., Debian) combined with libvirt for managing virtualization technologies like KVM, QEMU, and LXC containers. The second is Proxmox, a Debian-based platform that integrates both KVM for VMs and LXC for containers. Proxmox offers a user-friendly web interface for managing resources and includes features like live migration, distributed storage management (e.g., Ceph), and high availability through VM replication across nodes. Ultimately, I chose Proxmox for its versatility and ease of management.
The Hybrid Strategy: Docker in a VM
I’ve decided to use Proxmox as the base OS for managing my VMs and LXC containers, while also leveraging Docker to simplify the deployment of certain applications. The three main options for integrating Docker with Proxmox are:
- Install Docker directly on the Proxmox host node.
- Install Docker within an LXC container.
- Install Docker inside a VM.
Given my need for isolation and security, I opted for the third option: running Docker inside a VM. This approach allows me to benefit from Docker’s deployment simplicity while maintaining the added layer of security that VMs provide. If you’re curious about the performance of these options, I recommend reading this article: Running Docker on Proxmox.
Managing Networking
While Proxmox has built-in networking, I want more granular control. I’ll run OpenWRT, a powerful Linux-based router OS, inside its own VM. This VM will act as the master router and firewall for my entire homelab. I chose OpenWRT over pfSense or OPNsense because its Linux base offers better flexibility, especially for Wi-Fi management, as FreeBSD-based systems (like pfSense and OPNsense) have limitations in this area, as you can read from its documentation
VLANs
My network will be segmented using VLANs for security:
- VLAN 10 (Admin): For management interfaces like Proxmox and OpenWRT.
- VLAN 20 (Services): For internal services accessible only on the LAN.
- VLAN 30 (DMZ): For any service that needs to be exposed to the internet.
Managing Storage
Storage management will be handled with ZFS, which will mirror the two data disks in a RAID-1 configuration. ZFS features like snapshots, encryption, compression, and deduplication will help ensure data reliability and efficiency.
An LXC container will be configured to act as a Network-Attached Storage (NAS) server. This NAS will allow my VMs and other devices to access data over the network using various protocols, providing a customizable and hands-on approach to managing storage.
Managing Identities and Access Control
For centralized user management, I’ll use FreeIPA, an open-source alternative to Microsoft Active Directory. To provide Single Sign-On (SSO) for web applications, I’ll integrate it with Authentik.
While Proxmox offers some identity management features, I prefer to have full control over the configuration and use industry-standard tools to build a robust infrastructure.
The Blueprint
This plan is my starting point. Self-hosting is a journey of continuous learning, and I fully expect to adapt and refine this architecture as I go. To give you a clearer picture, here is a visual diagram of the planned setup.
What’s Next?
The blueprint is complete, and the hardware has arrived. It’s time to pick up the digital tools and start building. In the next post, we will bring this plan to life by installing Proxmox and laying the foundational layer of our new self-hosted environment.
That’s all folks, see you in the next post! 🚀👋